Showing posts with label DIY. Show all posts

6.20.2013

2-in-1 Girls NO SLIP Beach Towel/Bathing Suit Cover up

Okay it's taken me 5 summers but I have finally found the solution to keeping my almost 5 year old daughter's towel on her.  Long gone are the days of her dragging it on the ground of the pool deck or the beach.  Gone are the days of her complaining that it won't stay around her because it keeps coming untucked.  And gone are the days of me stuffing piles of beach towels in the beach and/or pool bag.

I have discovered there truly is a reason they call necessity the mother of invention....I have come up with a way to make a full size beach towel into a bathing suit cover up - pretty much guaranteeing it won't fall off or drag on the ground.  Are you ready for this? Okay, here goes the answer to all your summerly problems...

The 2-in-1 Girls NO Slip Beach Towel/Bathing Suit Cover Up 

It can be used as a full size beach towel...

...then when you're ready to head home, or just need to warm up slip it on like a jacket....


then wrap the long end around the front, putting the left arm through the third arm hole...


There's a tie in the back to tie bow to secure it in place (this picture shows the button version which I later changed because the bow is more easily adjustable for different sizes.)

 If it's too long in the back, just pull the towel up under the bow and it will keep it off the ground.

These babies have been in the works for months now and I'm happy to say I have finally figured out the ideal design!

Want one for your little girl? No problem, they're currently on sale in my Etsy shop "Cuteness Cubed." Just send me a note through Etsy if you don't see what you're looking for and I'd be happy to take orders. 


5.21.2013

Construction/Work Zone birthday party theme ideas (LOTS of pictures)

After weeks of prep for my son's 2 year old birthday party, the day has finally arrived...of course, it looks like the rain has too.   Whatever...nothing's gonna rain on our construction birthday party because the party must go on.

I searched pinterest and came up with some ideas on my own for the decorations, favors, and party activities and I'm so excited with how it all came together.   I have tutorials for everything on our sister blog, Two It Yourself, so just click the links for whatever you like and get the tutes.  In the meantime, check out all this fun construction party stuff.

Usually favors are handed out at the end of the party, but we did it a little bit differently.  Each guest joined Blake's Work Crew -- with a construction hat and personalized tool belt -- as soon as they arrive.   I had left over drop cloth material from my upholstered headboard project so I made each of the 25 guests (WTH was I thinking with 25 1-5 year olds???) a tool belt complete with a personal Home Depot-inspired logo.  Aren't they just adorable!!  I ordered the hats for $4 a dozen.  Tutorial for DIY kids tool belt is here. 

For decorations, I made construction zone bunting that reads "Blake Digs 2."

5.14.2013

Master Bedroom Makeover REVEAL: From drab to fab on a budget


Well it's been a few weeks...and I'm finally ready to show you our new master bedroom.  I am so thrilled with it because I finally feel like it's a relaxing, organized, and beautiful space.  Many of the projects I've been documenting with DIY tutorials on our brand new Two It Yourself blog so I won't go through all the details here, but if you are interested you can click the links to jump over to the tutes.

And without further ado here are the pictures of our newly redone master bedroom.  

To start, here's a panoramic view...
Panoramic view

4.25.2013

New DIY Site Launched

Hi All,  
Just wanted to let you all know that due to the fact that I'd like to try to keep this blog about mommy-hood, parenting, and worry about things such as poop, lack of veggies, and napless days - I've decided to branch out with another site/blog.

My sister and I have created a new website called Two It Yourself where we will be showcasing DIY ideas and projects.

We'll have everything from DIY home decor to Halloween Costume Making ideas some favorite Pottery Barn hacks and and even DIY Party Planning ideas.   If you're interested in some easy and budget-friendly projects we hope you'll join us as we have DIY 2IY!

Check out the brand spankin' new Two It Yourself blog!

As always, thanks for reading!
-Melissa


4.23.2013

How to make throw pillows: The 5 minute DIY version using standard shams

Now that the walls are painted a perfect shade of Revere Pewter and the upholstered headboard with nail head trim is done, I'm moving on in my master bedroom makeover with the details that really make a room.  My first project is a set of DIY throw pillows.

I ordered the $200 Poetical by Barbara Barry king size comforter.  (That was the sale price...yikes!) Usually, I wouldn't spend that much, but I really loved the look and I'm pretty picky about comforters so I splurged a bit there. (Click here for how I really made up for the cost with sheets and the coverlet.)

The comforter set came with two king size pillow shams.  Not only were they enormous and way oversized for our pillows, but I'm not a huge fan of pillow shams...so I decided to introduce them to my scissors and sewing machine to make four throw pillows.

These were seriously the easiest and cheapest pillows I've ever made.  Think about it, most of the work is done for you and you're left with only one side to sew.   The pillow shams were so large, they were each good to make two large throw pillows.  Here's a quick tutorial for how to make throw pillows out of standard shams - making them this way you can actually either stuff them yourself with fiber stuffing or use 20x20 or 18x18 pillow insert.   (This only works for shams that have a center envelope style closure as seen in the picture below.)

DIY Upholstered Headboard with Nail Head Trim: The Big Reveal

It's only been a few weeks and I'm happy to say that our master bedroom makeover is about 75% complete. The biggest project was making the upholstered headboard complete with nail head trim (oh, and finally getting the right paint color.)

My sister, Stephanie, agreed to tackle the job with me and today when our new Sleep Number bed came we finally got the finished look.  I can't be more thrilled with how it turned out.

As I said, when I laid out the plans for our new gray and white master bedroom, I was inspired by a dropcloth headboard I'd come across on pinterest originally done by Tenth Avenue South.
Pottery Barn Camelback Raleigh Headboard
DIY Dropcloth Headboard by Tenth Avenue South
It was practically an exact copy of the Pottery Barn Raleigh headboard that sells for about $1500 for the King size, which is what I needed.  The DIY version seemed easy enough -- and as it turned out -- it was.  We made the entire thing in the span of about five hours.

4.18.2013

DIY Kitchen Art (and how to spray paint straight line letters on canvas)

I have a huge wall in my kitchen that has remained empty for the two years we've lived here.  We've considered buying a piece of art to put on it, but I'm just afraid a year from now I'm not going to like it so I really didn't want to spend a whole lot of money on it.

The other day I was in Target and I came across these huge silver utensils -- they're nearly 3' high (click here to see more oversized fork and spoon decor).   I thought they'd be perfect so I picked up a fork and spoon for about $40 total.  The way they are made, you can only hang them vertically, which I was kind of bummed about since I  thought they'd look better on my wall horizontally. 

When I put them on the wall, despite their size, they still
seemed lost.  I told you my wall is huge!  I kept them hanging there for a few days and was just about ready to return them when my husband urged me to keep them -- suggesting we could buy these $50 Pottery Barn letters EAT.  Obviously he's not a real DIYer.


That got me thinking that I could make something similar and it would be the perfect kitchen art and hopefully wouldn't look too hokey.   I experimented a little bit with getting the letters on the canvas until I finally figured out the perfect technique for getting straight lines.
The result when I taped cardboard letters to the canvas
Having first cut out cardboard letters and taping them to the canvas and spray painting, I realized the spray paint was getting under the cardboard letters except where the tape was.  That gave me the idea to simply use packing tape to form the letters.  Of course it worked because EAT only have straight lines, unlike an "S" or "D."  Not only would it keep the spray paint out and keep the area of the letter perfectly white, it would also guarantee a perfectly straight line.
Packing tape applied directly to canvas to form letters
'Before' touch up
I created three canvases E - A - T and then spray painted them red.  After I took the tape off I
realized some areas around the edges had let a small amount of paint spill into the white area.  I used
Q-Tips dipped in nail polish remover to clean up the edges.  On areas that still weren't perfectly white after removing the red paint, I used some white out. 
'After' touch up

When I put the three canvases on the wall I thought the spray painted area looked a little blotchy.  I actually put a second round of packing tape over the original letter area.  This time I made sure all the edges of the tape were really firm on the canvas to avoid any leaks.  I then re-spray painted and when I was happy with the dried product, removed the tape.   I liked that look better. 

My final step was to outline each letter with a black sharpie.  I did this to cover up any imperfections along the edge and I think it worked. 
After adding Black Sharpie to hide imperfections

They're not perfect by any means, but that's what makes my kitchen art DIY!  Plus, when my kids won't eat their dinner, I just tell them to turn around and read the sign - the kitchen made the rule, not me!


4.15.2013

How to cook steak in the oven...I swear it works perfectly everytime

Perfectly cooked steak in the oven
I love a good steak.  I don't love a perfectly good cut of meat that is overdone, dry, and gray.   It needs to be pink and tender and preferably straight off the grill.   It used to be that we only had steak when the weather cooperated and we could use the grill.   But recently we've been cooking steak in the oven and they've come out perfectly -- if you know the secret.  Lucky, for you I'll let you in on the secret....okay, more like 8 of them.

Here's how to cook steak in the oven so it comes out perfect. We like medium rare...if you prefer your steak a little more well done, Step 6/7 is where you'll adjust the cooking time.

I got the wrong Valspar paint color...but there's good news

Note to self: NEVER take your 23 month old son to pick out paint colors.  I think I seriously just grabbed a paint swatch that was remotely in the rainbow of colors I'm considering and went with it.  I got two gallons of the stuff worth $75.

I got home and tested it on a small area and almost threw up in my mouth.  Um...I was looking for something in the gray family for my gray master bedroom makeover - this looks almost white with a hint of blue in it.

My first thought was to try to mix the paint with something that I already had in the basement to get the color more gray, but I didn't have anything that would even remotely work.  Then I went on Lowes' website to see about their paint return policy.  Turns out Valspar, not Lowes gives rushed, indecisive, or picky people, like me, who don't like the paint color a second chance - without having to shell out more money for another two gallons.  

4.11.2013

Gray Master Bedroom Makeover Phase 1: Picking colors, a budget, and getting PINspired

It's happening again...we went to change one thing and it ended up as a big project and a huge room update.  The first time this happened we ended up with a $5,100 new kitchen faucet.   Well, actually, we got a $100 faucet and decided we may as well put in $5000 granite counter tops, too.  Cause ya know, a new faucet requires new counters right? No...but anyway..did I mention we moved 6 months later?

This time there will be no moving - but a new bed has turned into redoing the entire master bedroom. 
Not a fan of the master bedroom paint color
We've been in our house exactly two years and while we've painted most of the other rooms, the master has been left alone.   Ironically, with it's rather drab and flat tan paint and marked up walls it was probably the room most in need of a fresh coat...So a new bed is a great excuse. 

Let me back up here for a minute...We've been sleeping on memory foam mattress for about a year, after the spring mattress I bought before we were married was deemed not comfortable enough by the Mr.  But, I'd say about 300 days of the last year I've woken up with a stiff back thanks to the memory foam

So, this time we're biting the bullet and going with the big guns - a Sleep Number bed.  That was awkward laying on beds in the middle of the mall to figure out I'm a 35..but I digress.  Anyway, after 8 years of wedded bliss apparently the honeymoon's over - my hubs isn't liking the cozy queen anymore and so I can stop cramping his sleeping style, we're upgrading to a king.  So add to the paint, all new bedding, plus a new bed (headboard, etc) and there you have the makings of a master bedroom makeover.

4.08.2013

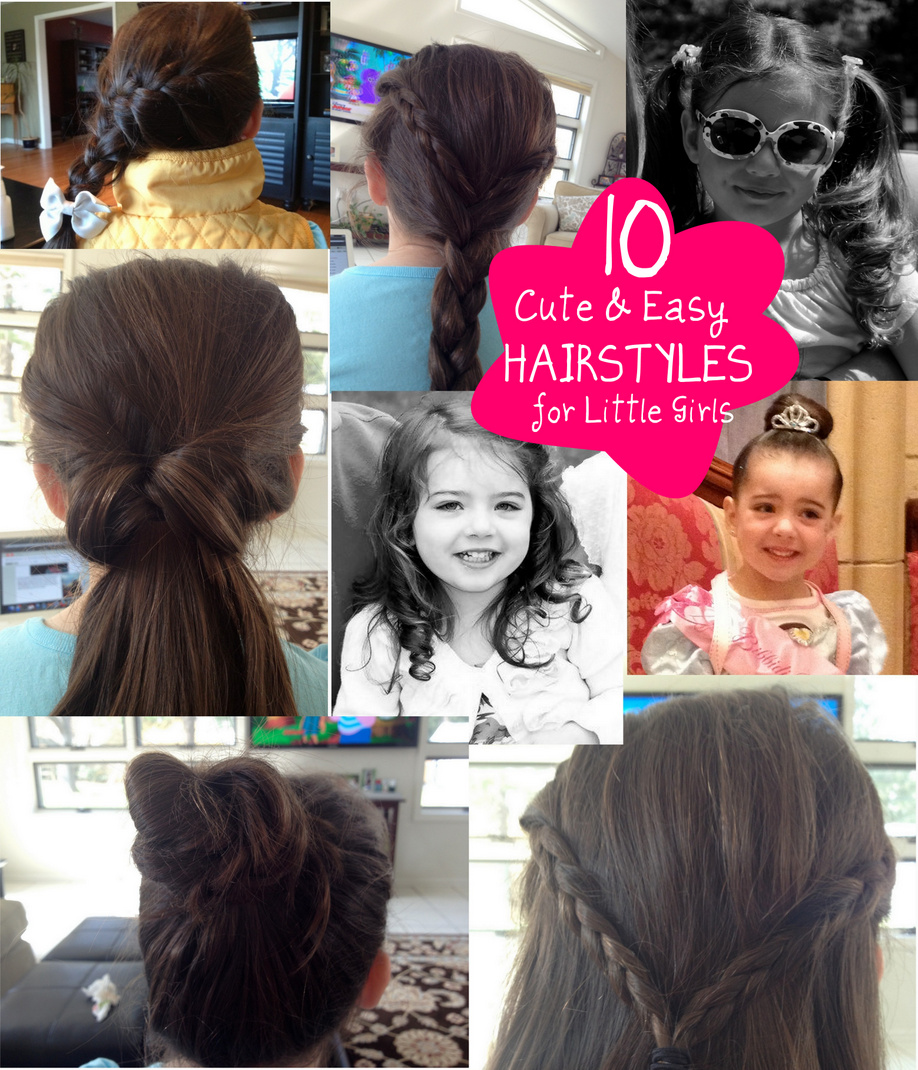
Cute hairstyles for little girls...not your ordinary ponytail

My little girl is always looking to change up her hairstyle.  While we often resort to a ponytail as we're running out the door, some days I'm up for doing something that's well, a little cuter than a ponytail.

Now that we have finally found a brush for tangled hair that cuts through the knots without tears, running, and screaming we are getting a little more adventurous in the hair department.

This morning she asked for two braids with a bow at the bottom of each.  At the same time I was trying to keep my pooping son on the potty so I wasn't left with a trail of poo, we were already running late for school (goodbye, spring break), and her hair wasn't even brushed yet.  I suggested one braid. She requested a side braid and so we compromised.

Control crazy hair w/ these cute hairstyles
The only problem is, she still has a lot of whispies and she has a side part.  That equals hair.in.the.face in a matter of about two minutes. ^^^^Case in point^^^^

3.23.2013

DIY Disney themed photo books

Minnie Mouse for a DIY Disney themed photo book
Disney themed photo books are not the easiest thing to make because, from what I've found, there's only one online scrapbooking service that offers Disney packages.  I looked around for awhile after our recent trip and found that Snapfish offers Disney themes for an added prices -- albeit not too much.  The only problem, and what stopped me from using that service, is you can only pick one theme for the entire book and you can't mix and match with other Disney-related photo themes.  If you want your entire Disney photo book with a Mickey theme or want your entire family vacation on a Princesses backdrop you're in luck.  I was not a fan of being limited by just one theme so I set out to make my own Disney themed book.

3.22.2013

Easter party favors or cheep treats for classmates

I'm in the middle of planning an Easter egg hunt party and wanted to give the kids a little favor to take home with them. I came up with this idea of "cotton tails and bunny trails."

My kids love marshmallows and chocolate and anything 'potty' related always gets a giggle (Why is that...???) hence the "trails" aka chocolate chips. 

I put about half a cup of the mix in plastic treat bags (I cut the 9" bags down a little so  I didn''t have to fold over too much of the top of the bag) and stapled them closed with a festive printout I quickly made on the computer.

They could also be given out to classmates as an Easter or spring treat at a class party.

Easy and cheap cheep!


More Easter Ideas


3.11.2013

Playroom ideas: Decorating with kids art is a budget saver

It's been two years since we moved into our house and finally we have something on the walls in the playroom.  I've been searching for playroom decorating ideas for a few months.    I knew I wanted to use the kids' art work to decorate, but I wanted to decorate the playroom on a budget.  The tough part is we have four huge walls, so to cover them with anything -- art or otherwise -- wasn't going to be easy or cheap.   

3.10.2013

Easter craft with peeps...my take on the popular peeps topiary


So as I said I'm on an Easter Pinterest hunt and one of the things I kept seeing when I searched for Easter Kids crafts was this Peeps Topiary.  Woman's Day Magazine published the original story/idea and it's super cute. It's been repinned a bunch of times and I totally understand why.  I mean, I'm not a huge fan of eating Peeps, but decorating with them...why, yes, I could do that!

Like I mentioned in my post about the Easter 2-for-1 dessert, I went on a little (okay, BIG) Easter shopping spree at Walmart the other day...oh, and I might just have also happened to swing by AC Moore for a few crafting supplies. Anyway, I had four boxes of peeps, spray paint, and the easter grass that was needed.   I knew I had a little clay planter pot in the garage, but I was still on the hunt for a dow needed as the "stem."  (I got a few old cross stitching rings from my mom.)

I'm in the middle of potty training my 22 month old son, so running around looking for this dow was not my top priority.  However, when I get an idea in my head - look out because it consumes my thoughts...keeps me up at night and drives me basically crazy until I do it!  To say I was being a bit inpatient about getting this thing on my mantle might be an understatement so I went hunting for a stick in my front yard.  Basically that means I stepped out the front door and picked up the first one that looked long and strong enough. But I almost underestimated the power of peeps.

11.11.2009

Inexpensive playroom decorating ideas

My living room is thanking me right about now.  Our newly finished playroom has provided some much needed relief from the over abundance of toys, stuffed animals, and riding toys that were taking over the family room.

The way our home is set up the main floor is on the second level. The ground level is a large open room that has somewhat of an obvious divide. The front we've always used as a home office, the back...well...that's up for debate. It was a "craft room," a storage facility...okay, I'll admit it: it was wasted space. It was also the perfect spot for a playroom.

Not wanting to spend much money on updating the room, but knowing it needed some fixing up before it was suitable for a toddler, it became my most recent DIY project.  So I started looking for some playroom decorating ideas and here's what I came up with.

Using my daughter's toys brightly colored toys for inspiration I picked a cheery yellow color paint for the walls.


With limited space but still wanting to give my daughter a creative outlet, I opted to paint a chalkboard on the wall, rather than take up floor space with an easel. I have half a can of chalkboard paint leftover, and already have a few ideas how to use it!


We purchased a full size pull-out sleeper sofa off of Craiglist. It's no wonder it was for sale. Not only does the thing weigh what must be 100 pounds, it's ugly as anything.  The addition of the sofa provides seating and a much needed extra bed for overnight guests.

The arms of the sofa are such that I was unable to find a slip cover without getting it custom made. For a play room that was simply not an option for me.  Thus the DIYer in me got inspired by a set of sheets. I searched a online and bought two blue and white striped queen size flat sheets on clearance.  Over the next few weeks I crafted my own slip cover and I must say I'm pretty impressed with myself.


I had enough left over material to make three simple window treatments as well.


Surprisingly, the spare TV still works despite the inch of dust, dog hair and bugs it gathered over the past two years sitting in the corner. But without cable in the room, we moved our DVD player to the playroom (our newly purchased Play Station 3 doubles as a DVD player for the living room...I'd never admit it to my husband who had to have it...but I guess it turned out to be a useful buy) for my daughter to watch movies.

I purchased an inexpensive TV stand with adequate storage for toys, books, DVDs, and whatnot to further organize the space. 


To get even more stuff off the floor and to avoid taking up more floor space, my daughter will be getting a toy hammock to hang on the playroom wall for stuffed animals.

Can of paint: $25 (-$5 mail-in rebate)
Chalk Board Paint: $10
Sofa bed: $100
Sheets for sofa slip cover: $40
TV stand: $130 from Target, $125 on Amazon.com


Playroom Updates: $300


Have you created a designated play room in your home? Share your best playroom decorating ideas with us by leaving a comment below!
Related Posts Plugin for WordPress, Blogger...

New Mama's Store